Ever since I wrote the blog post on sensing hydrogen sulfide using Arduino Due, I have received a lot of comments and messages about using the sensor with the more popular Arduino Uno.
To use the sensor with the Arduino Uno, one must overcome two issues. The first issue relates to the fact that the sensor uses 3.3V logic and power, while the Arduino Uno is a 5V board. The second issue lies in the fact that Arduino Uno has a single serial port, and that post is commonly used for debugging.
Overcoming these two issues is relatively easy.
To solve the logic level issue, one can take 3.3V power from the Arduino Uno and use a logic level converter like BOB-12009 from Sparkfun.
Then, one can rely on using SoftwareSerial to create a emulate a second serial port in software, and make some minor changes in the code to accommodate this. Please note that SoftwareSerial doesn’t work on all Arduino pins. In my code example I used pins 10 and 11, but if you wish to change that, do read first the documentation and make sure the pins are supported by the code library.
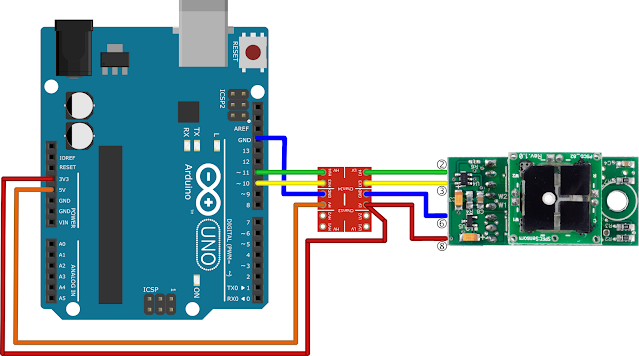
For this example, I have connected the H2S sensor as follows:
 |
| Connecting the H2S sensor to Arduino Uno |
The logic level converter receives 5V (orange wire) and 3.3V (red wire) from Arduino Uno. The 3.3V voltage also goes to pin 8 of the H2S sensor.
GND (blue wire) runs from Arduino Uno to the logic level converter and then to the H2S sensor.
Pin 11 runs to the HV4 pin of the logic level converter. Its counterpart LV4 is connected to pin 2 (RXD) of the H2S sensor. Later, in the code, this pin will become SoftwareSerial TX.
Pin 10 runs to the HV3 pin of the logic level converter. Its counterpart LV3 is connected to pin 3 (TXD) of the H2S sensor. Later, in the code, this pin will become SoftwareSerial RX.
This is how the connections are made on a breadboard. I used the same colors of wire as in the above diagram, to make things easier to follow:
 |
| Arduino Uno connections to H2S sensor |
If you don’t want to dig into the datahsheet of the sensor, here is a detailed image of the H2S sensor connector:
 |
| H2S sensor pinout |
- pin 1 – N/C
- pin 2 – RXD
- pin 3 – TXD
- pin 4 – N/C
- pin 5 – N/C
- pin 6 – GND
- pin 7 – N/C
- pin 8 – V+ (2.6 to 3.6V)
H2S sensing with Arduino Uno: the code
The code is the same as in the original blog post, with only minor changes to accommodate SoftwareSerial:
That’s all folks!


2 Comments
Hello, I have been using spec sensors for a while and facing following issues -
ReplyDelete1. Fluctuation in raw nA current readings and hence the conc. values. Large fluctuations of 15-20 ppm in a time span of only a few minutes.
2. The baseline concentration are very high, eg for so2 it is 2-3 ppm and when it should be 70 -100 ppb.
3. There is no good repeatability between sensors, though which can be taken care of with calibration but the calibration setup costs a lot and contains a air tight chamber, gas cylinders, and controlled and safe exhaust of the gases. So then the sensors are not cost effective.
Could you please help me identify solution of these problems?